Telerik UI for WinForms最新版下载
IronPython和最新的Visual Studio 2019使这一切成为可能,它们使Python桌面应用程序可以与WinForms控件一起使用。 更重要的是,Telerik UI For WinForms套件拥有现成的一些功能来帮助您实现想要的功能!
Iron Python
IronPython是Python强大的开源版本,它是在Microsoft .NET框架上运行的Python编程语言的改编,IronPython可以使用.NET Framework和Python库,而其他.NET语言也可以轻松使用Python代码。
安装最新版本的IronPython之后,您可以打开Visual Studio 2019,该Studio带有用于“ IronPython Windows Forms Application”的内置模板项目,并创建您的第一个应用程序。
如何将Telerik RadGridView与现代Fluent主题集成到您的应用程序中
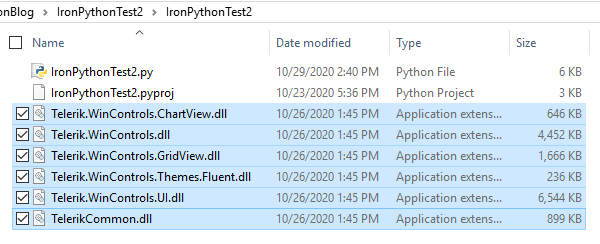
首先,您需要安装Telerik UI for WinForms UI组件套件 - 您可以从此处点击下载,然后将所需的Telerik程序集添加到项目文件夹中,以使用WinForms的RadGridView、FluentTheme和RadChartView(spoiler alert,稍后将需要它)控件。
要在应用程序中引用二进制文件,请导入clr库,然后使用addReference方法。 在这里,您可以看到如何添加示例应用程序所需的参考和用法。
import clr
import random
clr.AddReference('System.Drawing')
clr.AddReference('System.Windows.Forms')
clr.AddReference('Telerik.WinControls')
clr.AddReference('Telerik.WinControls.UI')
clr.AddReference('Telerik.WinControls.ChartView')
clr.AddReference('Telerik.WinControls.Themes.Fluent')
clr.AddReference('TelerikCommon')
clr.AddReference('Telerik.WinControls.GridView')

from System.Drawing import *
from System.Windows.Forms import *
from Telerik.WinControls import *
from Telerik.WinControls.UI import *
from Telerik.Charting import *
from Telerik.WinControls.Themes import *
现在,让我们看一下如何添加radGridView控件,其中包含一堆不同的列。
#Define RadGridView
self.radGrid = RadGridView()
self.radGrid.BestFitColumns()
self.radGrid.ForeColor = Color.Black
self.radGrid.Dock = DockStyle.Fill

#Define Columns
self.decimalColumn = GridViewDecimalColumn()
self.textBoxColumn = GridViewTextBoxColumn()
self.colorColumn = GridViewColorColumn()
self.checkBoxColumn = GridViewCheckBoxColumn()
self.ratingColumn = GridViewRatingColumn()

self.decimalColumn.HeaderText = "DecimalColumn"
self.textBoxColumn.HeaderText = "Text"
self.colorColumn.HeaderText = "ColorColumn"
self.checkBoxColumn.HeaderText = "CheckBoxColumn"
self.ratingColumn.HeaderText = "RatingColumn"

self.radGrid.Columns.Add(self.decimalColumn)
self.radGrid.Columns.Add(self.textBoxColumn)
self.radGrid.Columns.Add(self.colorColumn)
self.radGrid.Columns.Add(self.checkBoxColumn)
self.radGrid.Columns.Add(self.ratingColumn)
self.Controls.Add(self.radGrid)

#Populate Rows
for index in range(10):
self.radGrid.Rows.Add(index, "Sample Text " + str(index), Color.FromArgb(random.randint(1,255), random.randint(1,255), random.randint(1,255)), CheckState.Checked, random.randint(1,100))
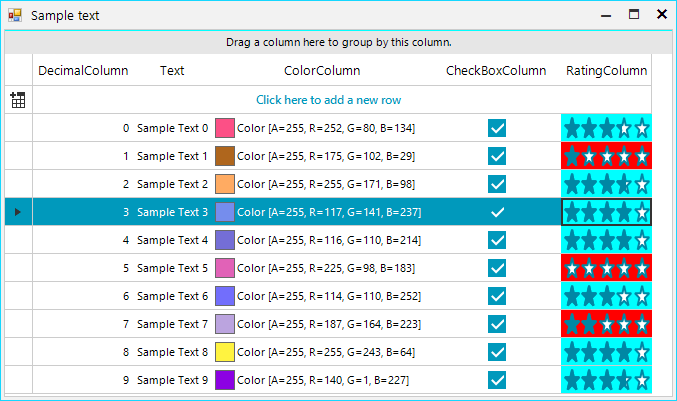
该结果是一个radGridView,它具有以下列:GridViewDecimalColumn,GridViewTextBoxColumn,GridViewColorColumn,GridViewCheckBoxColumn,GridViewRatingColumn。
如图中所示,如果您想将主题应用于控件,则可以如此简单地完成。
fluent = FluentTheme()
self.ThemeName = fluent.ThemeName
self.radGrid.ThemeName = fluent.ThemeName
订阅事件并实现您的业务逻辑
这是创建RadButton控件并订阅其Click事件的示例。
#Define RadButton1
self.myButton1 = RadButton()
self.myButton1.Text = "RadButton1"
self.myButton1.Click += self.OnButton1Click
self.Controls.Add(self.myButton1)
然后,您将必须定义OnButtonClick逻辑。
def OnButton1Click(self, sender, args):
#TODO OnClick logic
现在,我们使用上一个示例中的radGridView来看一个更复杂的事件相关示例。 我们将在CellFormatting事件中实现一些逻辑,以便用不同的颜色填充GridViewRatingColumn中的单元格。 Rating单元内的值可以在0到100之间,如果值<50,我们将用红色填充这些单元,否则我们将使用Aqua颜色。 我们可以使用以下代码实现此结果:
def OnRadGridCellFormatting(self, sender, args):
if args is not None :
if args.Column.HeaderText == "RatingColumn" :
if args.CellElement.RowInfo.Cells[4].Value is not None :
if args.CellElement.Value > 50 :
args.CellElement.DrawFill = True
args.CellElement.ForeColor = Color.Blue
args.CellElement.NumberOfColors = 1
args.CellElement.BackColor = Color.Aqua
else :
args.CellElement.DrawFill = True
args.CellElement.ForeColor = Color.Yellow
args.CellElement.NumberOfColors = 1
args.CellElement.BackColor = Color.Red
else :
args.CellElement.ResetValue(LightVisualElement.DrawFillProperty, ValueResetFlags.Local)
args.CellElement.ResetValue(LightVisualElement.ForeColorProperty, ValueResetFlags.Local)
args.CellElement.ResetValue(LightVisualElement.NumberOfColorsProperty, ValueResetFlags.Local)
args.CellElement.ResetValue(LightVisualElement.BackColorProperty, ValueResetFlags.Local)
CellFormatting最终结果是这样的:
RadChartView的Little Bonus Setup 示例
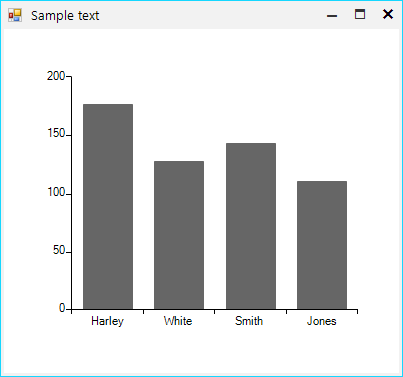
正如在radGridView示例中看到的那样,使用Telerik控件非常容易,我们来看另一个使用BarSeries设置radChartView控件的示例。
#Define RadChartView
self.chartView = RadChartView()
self.chartView.Size = Size(290, 160)
self.chartView.Dock = DockStyle.Fill

#Define BarSeries and CategoricDataPoints
self.barSeries = BarSeries("Performance", "RepresentativeName")
self.barSeries.Name = "Q1"
self.categoricDataPoint1 = CategoricalDataPoint(177, "Harley")
self.categoricDataPoint2 = CategoricalDataPoint(128, "White")
self.categoricDataPoint3 = CategoricalDataPoint(143, "Smith")
self.categoricDataPoint4 = CategoricalDataPoint(111, "Jones")
self.barSeries.DataPoints.Add(self.categoricDataPoint1)
self.barSeries.DataPoints.Add(self.categoricDataPoint2)
self.barSeries.DataPoints.Add(self.categoricDataPoint3)
self.barSeries.DataPoints.Add(self.categoricDataPoint4)
self.chartView.Series.Add(self.barSeries)
self.Controls.Add(self.chartView)
结果与您期望的Telerik UI for WinForms应用程序一样。
了解最新Kendo UI最新资讯,请关注Telerik中文网!
标签:
本站文章除注明转载外,均为本站原创或翻译。欢迎任何形式的转载,但请务必注明出处、不得修改原文相关链接,如果存在内容上的异议请邮件反馈至chenjj@evget.com
文章转载自:慧都网


 首页
首页 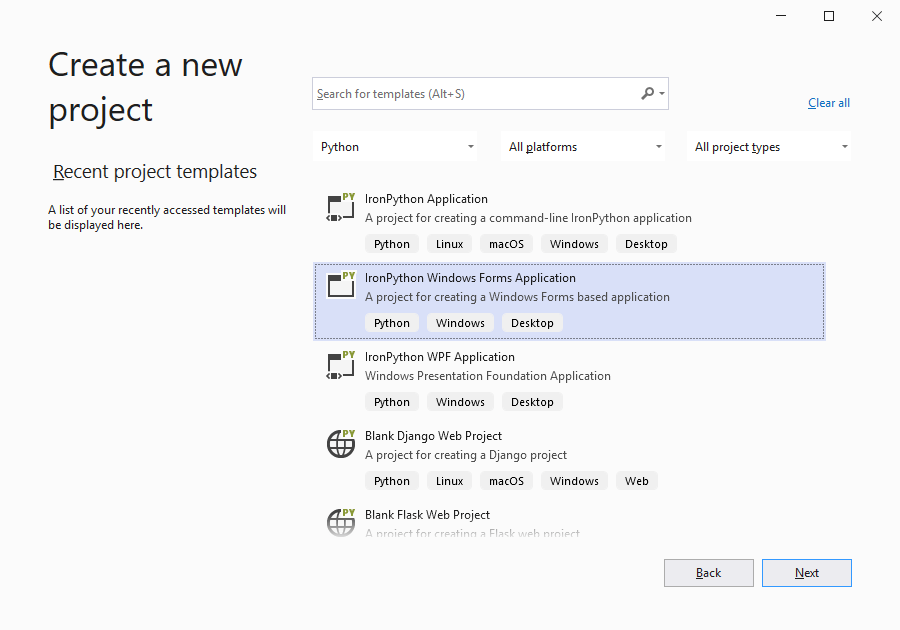


 12次
12次

 相关产品
相关产品 最新文章
最新文章 
 相关文章
相关文章 
 微信
微信 在线咨询
在线咨询


 渝公网安备
50010702500608号
渝公网安备
50010702500608号

 客服热线
客服热线